Showing posts with label homemade. Show all posts

Monday, December 18, 2017

Awesome DIY All Natural Gifts for Christmas with Essential Oils!


It's coming faster than I could ever imagine!!! Christmas is only a week away! But no fear you can put these easy but high quality gifts together in no time! Links provided for reference are also affiliate links which means I could earn a little money if you buy from them but it does not cost you any more. (Thank you for your support!)


ALL NATURAL HEATING PAD: For this project you need all natural cotton fabric such as flannel, rice and a sewing machine.

1. Cut cotton fabric to make a pouch.

  • for each pad you need to cut 2- 8x20 inch pieces. 
  • place two pieces together right side in
  • sew three sides shut, leaving one end open for filling
  • turn them right side out

2. Add 6 cups rice.
3. Sew end shut.

  • If you wish you can divide it up into three parts with 1.5 cups in each part. You would simply add 1.5 cups rice, sew it at 1/3 line, add 1.5 cups, sew at 2/3 line, add the last 1/5 cups and sew it shut. This does make sewing the end a little harder.

4. Include instructions for the receiver: Microwave about a minute to desired temperature (careful it gets hot!) Add a drop of essential oil to the pad then place pad on skin. Enjoy!
5. Include a sample bottle of essential oil and a special note! (I recommend including lavender for relaxing or peppermint for pain)


Sterling Silver Diffuser Necklace:  For this project you need pliers, a chain necklace (I used 20" Sterling Silver), a 3 inch eye pin and 5 lava beads (I used 8mm size).

1. Find the center & cut your necklace in half with wire cutters. It helps to wiggle it when in the cutter.
2. Attach one end of the eye pin to one end of the cut necklace. It helps to open it slightly. Then once on, close it again so it does not slide off.
3. Add 5 lava beads.
4. Curl the end with the jewelers tool, but don't close the loop yet.
5. Add it to your other end of the cut necklace then close the end.
6. Wrap with a sample bottle of your favorite blend and a special note!


Yuletide Reed Diffuser: For this project you need a small bottle with a narrow neck, sunflower oil (or similar thin carrier oil), your choice of essential oils and reeds. (I really liked these wavy reeds which are naturally dried in the sun and not died or bleached.) Note: I found my bottles at Michaels. You want one with a small neck and wide base to limit the evaporation and reduce the chance of it getting knocked over.

  1. Wrap a ribbon or jute twine around the 10 reeds for gifting. Add a note with instructions for the receiver: Remove cork and insert reeds in top of bottle. In 24 hours turn reeds over to help oil saturate entire reed. Turn reeds once a week or as desired.
  2. Using the funnel, add 1/4 cup oil to the bottle.
  3. Add 40-60 drops essential oils. We used equal amounts of pine clove and orange. A second options being abundance and peppermint in equal amounts.
  4. Seal bottle well with cork. 
  5. Wrap and add tag. 


Bath Truffle: For this project you will need baking soda, citric acid, white kaolin clay, cocoa butter, Shea butter, essential oils, a mold, lavender essential oil, dried lavender buds (optional) and pink Himalayan salt (optional).
1. Measure by weight 4 oz cocoa butter and 2 oz Shea butter into glass jar and put in a double boiler to melt.
2. Prepare mold by adding dried lavender buds, Himalayan sea salt or other top like rose petals to the bottom.
3. Mix in a separate bowl:

  • 2 cup baking soda
  • 1 cup citric acid
  • 1 cup kaolin clay

4. Once oils are melted remove from heat and add 20 drops of lavender & mix.
5. Pour oils over dry mix & mix with spoon. Once mixed kneed with fingers to finish mixing.
6. Press into molds. In my mold it made about 19 cubes.
7. Refrigerate about 30 minutes then remove from mold.
8. Wrap with tag & instructions for receiver:
Drop one bath truffle into your bath as you fill it. Enjoy!


Snow globe Cookies Top: You will need the lid and ring off your mason jar, white paper, hot glue, miniature ornaments or other small decorations, decorative snow, clear plastic ornament.

  1. Trace lid onto white paper and cut out.
  2. Hot glue white circle to top of lid to form your base. 
  3. Hot glue ring to lid. (Lid on bottom).
  4. Cut off thread hangers off the miniature ornaments and hot glue them standing up & facing forward onto paper the on lid.
  5. Place a small pinch or two of snow in center.
  6. Put hot glue on the edge of one half of ornament. Center on lid with hook towards the back.
  7. Allow to dry while you fill jar


Snow globe Cookies Jar: You will need a quart mason jar, orange essential oil, measuring cups and the ingredients for the cookies. It also helps to have a jar funnel for this project.

Add ingredients to jar in order, do not over fill or it won't all fit.
1. 1/3cup sugar
2. 10 drops of orange essential oil- you can mix slightly but try to keep it level
3. 1/3 cup brown sugar (pack it in)
4. 3/4 cup flour
5. 1/2 tsp baking powder
6. 1/8 tsp salt
7. 1 cup oats
8. 1 cups cranberries (a little less than 1 cup, do not pack it in the measuring cup. this ingredient is important to not over do it or your chocolate chips will not fit!)
9. 1 cup white chocolate chips (may end up being a little less)
10. add snow globe lid (instructions above), ribbon with cooking instructions.

Instructions to tie to jar:
❄❄Snowglobe Cookies❄❄: Pour cookie mix into a large bowl; stir to combine. Beat in 1/2 cup melted butter, 1 egg and 1 tsp vanilla. Cover and refrigerate for 30 minutes.
Drop by the tablespoonfuls 2 in. apart onto ungreased baking sheets. Bake at 375° for 8-10 minutes or until browned. Remove to wire racks to cool. Yield: 3 dozen.


I hope you have a blessed Christmas and enjoy making these fabulous gifts. For more ideas, see my other posts on Christmas gift ideas here: 2016 Gift ideas and 2015 Gift ideas and 2014 ideas and Men's ideas.

Merry Christmas!

If you enjoyed this post, I’d be very grateful if you’d help it spread by emailing it to a friend, or sharing it on Google+, Twitter or Facebook.

Thursday, April 6, 2017

Green your Clean Series! Laundry room

Let's get real. Cleaning is one of those things either you love or you don't. I do not like to clean but I hate a mess. What a predicament?? I really want to challenge you (and myself) to look at the products you use around the house to clean and to try something new.

Lets start off this Green your Clean series in the laundry room.

Confession time... I used to be a fabric softener-aholic (yes that is a word). I used several dryer sheets and liquid softener! I had no idea what horrible toxins I was absorbing by putting on my (and my family) clothes daily. The chemicals found in fabric softeners are known neurotoxins, hormone disruptors, allergens, asthmagens and carcinogenic. Just Google it... no lie. You will be a bit overwhelmed. Needless to say, I stopped several years ago and went green. Lets talk about options.

Option 1: Vinegar
Several years ago, I went cold turkey. I changed over to using vinegar in my rinse cycle. In my old washing machine I would add it at the end or use my old dryer ball (until I decided to give that old thing up too). Then I got a machine that had a fabric softner dispenser so it was a no brainer. Pour my vinegar right in there- easy peasy.  Super cheap and soft clothes. Its been about five years now and I have not had any problem with static. Honestly, I can no longer stand the smell of laundry softener. I went through some old bins of clothes last summer that were from way back in my softner days and I just about choked on the smell.

Option 2: Wool dryer balls
Another option is to use wool dryer balls. They help speed up the dry time, soften, decrease static and can also be used with essential oils to add a scent to your laundry. 

I recently made some and was amazed at how easy it was! I have been leaving them in my dryer to help speed up the process (save energy). My clothes have certainly been drying faster.

You need to buy the kind of wool that is not made for washing so it will felt. No blends. I used two skeins of roving wool to make six balls. Super simple. You wind them into tight balls. Once you get the size you want, cut the yarn and tuck in the end.

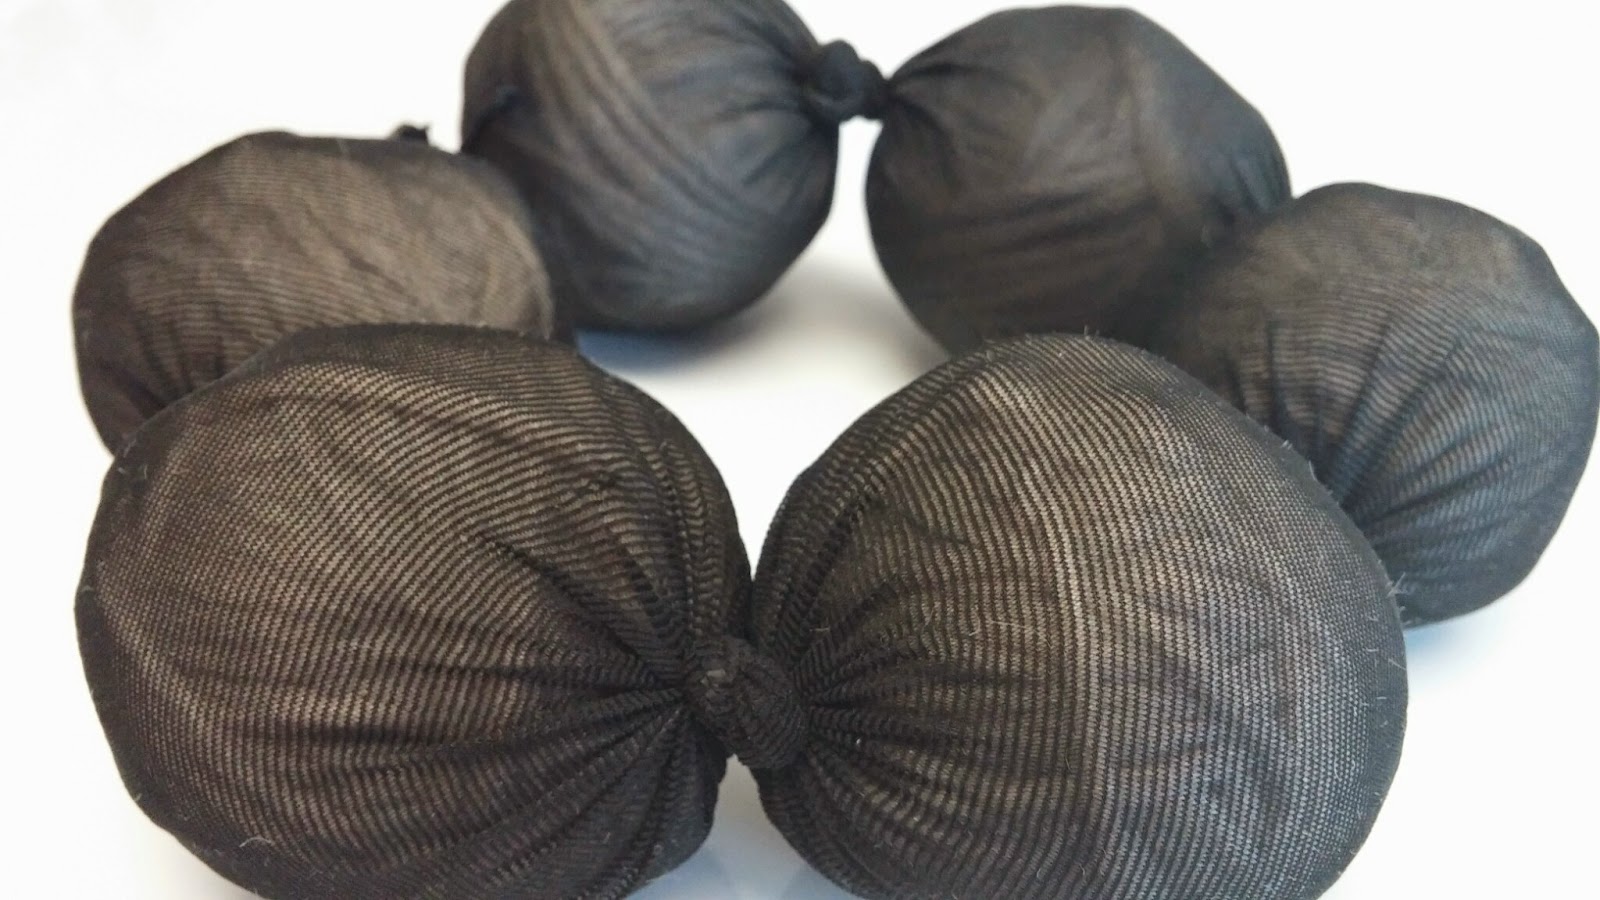
Then you place them into old pantyhose and tie them off. Put them in with the wash and dryer for a few loads. Then remove them from the pantyhose. They should be felted. (You should  not be able to pull the strings apart.)

They are so cute and simple! If you want to add scent just add 3-4 drops of essential oil right onto each ball. You can add more or less depending on the level of scent you desire. Lavender or purification are great ones to start out with but the possibilities are endless.


Option 3: Home made dryer sheets

This one is the newest of the three I am trying out. My cousin has been using these for awhile and highly recommended them. I quite honestly love the smell! Seriously, it is so simple to make your own dryer sheets.

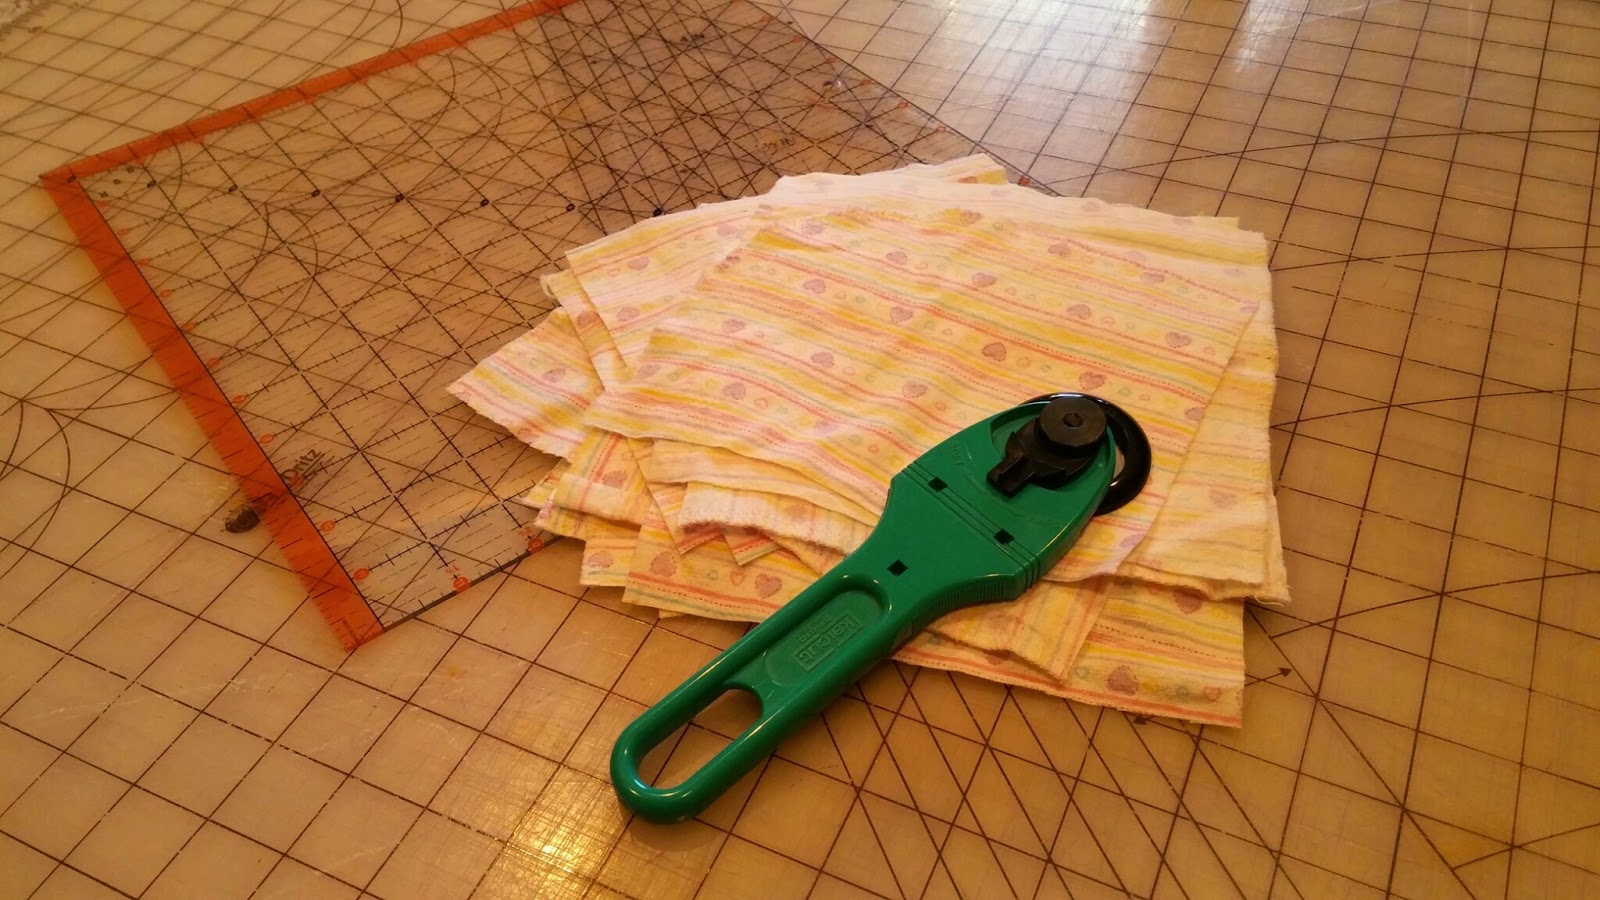
I had several receiving blankets in the donation pile. So I decided to use one for this project. You can also use old flannel sheets or t-shirts.  I cut them into squares. But generally dryer sheet size around 6x6 is good. Nothing fancy, just chop chop.


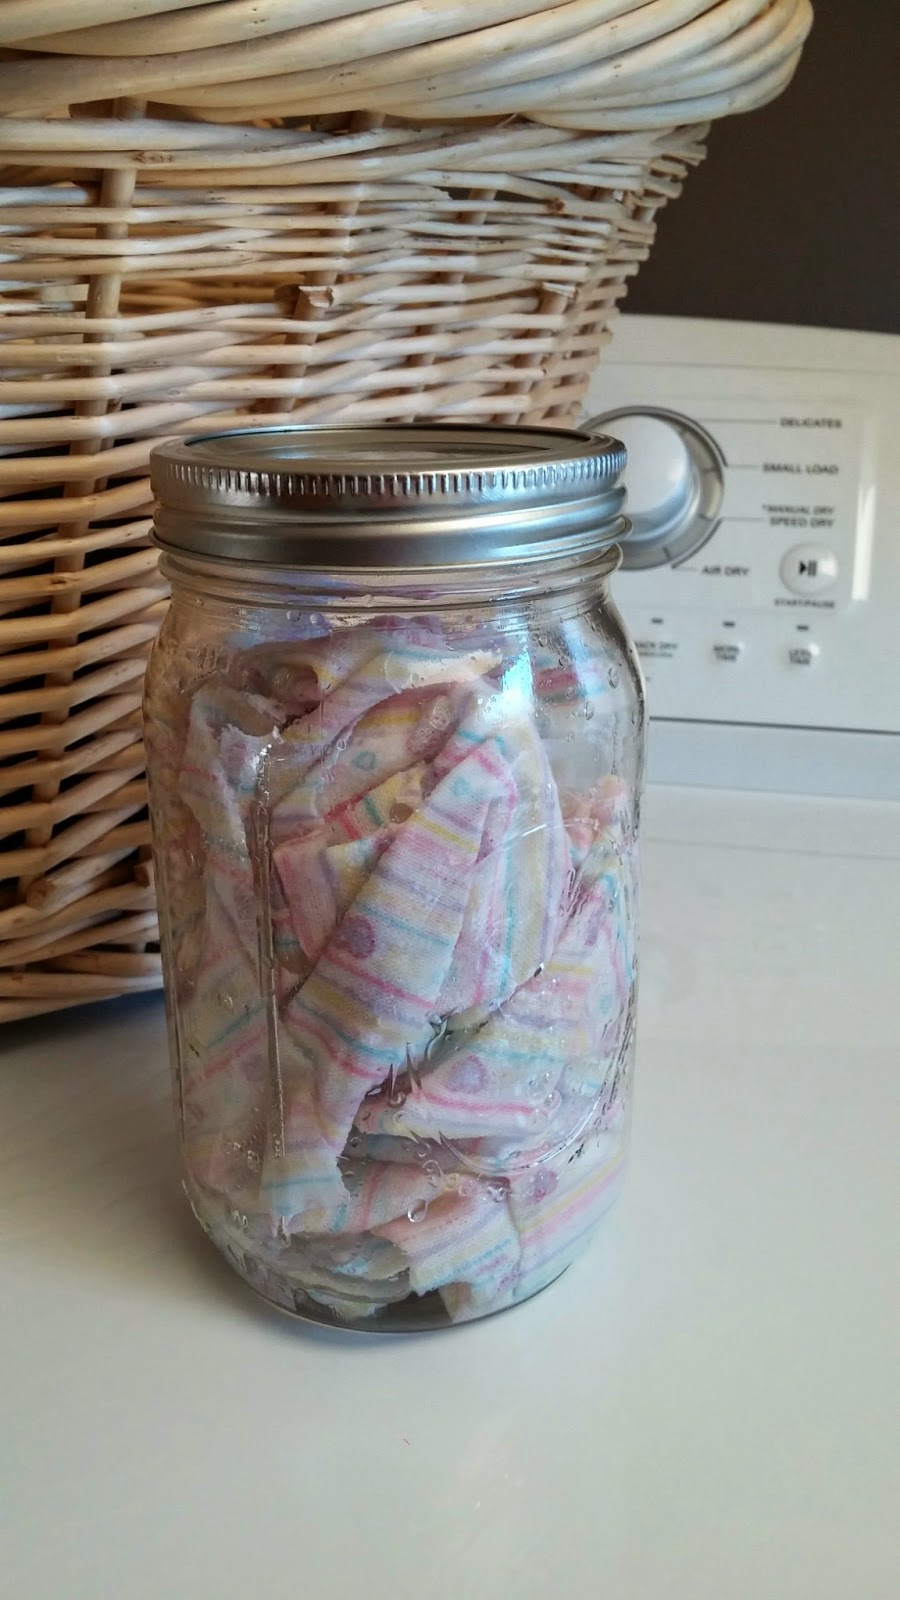
Stuff the pieces of fabric into a mason jar. In a separate bowl mix one cup of vinegar and 20-30 drops of Young Living essential oils then pour over fabric. Make sure oil mixture is evenly distributed over fabric, then shake to distribute.


Add a cloth or two to your dryer load, then throw them back in the jar. You can reuse them as much as you want!


So there you have it... three easy ways you can green your clean today! Try one out and let me know what you think! I will be back with more ways to clean up the toxins soon.

Blessings!

If you enjoyed this post, I’d be very grateful if you’d help it spread by emailing it to a friend, or sharing it on Google+, Twitter or Facebook.


Sunday, June 19, 2016

God save the Queen


So where did I leave off on our girls journey? Oh yeah I left you up on the hill wondering about the possibly missing queen. Well long story short... turns out she flew the coup. After eight days there was still no sign of eggs in the hive. The other two hives had brood (babies) at various stages. My bee supplier did not have queens in stock for another week. To top it off in three days we were leaving for vacation for a week so there was literally nothing I could do until I returned.

When we returned from vacation I inspected the hive. I was elated, I found capped brood and larvae! That means eggs were being laid. Well lets say I had a brief period of excitement. Until I realized it was not the kind of eggs I needed. It was all drone brood. What is drone brood? Drones are boys. When you have ALL boys that most likely means the female that is laying eggs is not fertile (has not been mated), and not a queen. It means one of the girls panicked and started to lay eggs. She is called a laying worker.

When you have a laying worker, the hive thinks it has a queen since there are eggs and brood. However a laying worker can only lay unfertilized male eggs. This means as time goes on there will be less and less females to do the work. (Boys do nothing in the hive but consume food and fly off to mate with queens from other colonies).

As I started to research this I found that it is really hard to correct this problem. Its impossible to identify which female bee from thousands of bees is the one that decided to lay eggs. So all the female workers look the same. How do you get rid of her to replace her with a new queen?

After much discussion and research I came up with a plan. When my new queen arrived I had to dump the entire hive out of its home about 50 feet away up the hill. The reason for this is that the laying worker would not be able to fly back to the hive. Her abdomen is swollen since she started to lay eggs and she would not be able to fly. The majority of the other bees would fly back home.

This hive was already weak from being almost a month with no queen. So once I removed every single bee, I brought back the box and switched places with one of the other hives. The foraging bees who were out in the fields collecting pollen and nectar would return to the place they left from and make the weak hive their new home. This would give my weak hive a boost while the new queen had time to get accepted.

A hive can only have one queen. They identify their queen by smell. This queen was brand new and they would not recognize her. Queen Athena needed to be released slowly or the hive would kill her. Her cage had a piece of fondant candy plugging the hole. This candy would take the bees 3-5 days to chew through to release her. In that time the hope is that they will become accustomed to her scent and accept her.


I checked at five days and surprisingly she was still in the cage. I waited one more week. When I returned I am happy to say I found her walking around a frame. She was out of her cage and was alive. All good news! So I removed the empty cage and closed up the hive. Letting her start her very important work of rebuilding the hive. She has a lot of work ahead of her, she is a month behind so hopefully she can build enough of a colony for winter. Only time will tell.


For now, that is the buzz... blessings!

If you enjoyed this post, I’d be very grateful if you’d help it spread by emailing it to a friend, or sharing it on Google+, Twitter or Facebook.
Sunday, June 12, 2016

Girls on the bus, are you ready for this?


Like many beekeepers, our colony did not make it through winter. So this spring I ordered three new packages of bees. Mid April, they arrived in these new "buses". The plastic cages you see here. I was hoping they would be easier that the wooden ones but more on that later.

When the packages arrived, I was home with both the kids. The bees had already been in their bus for a week. I decided I could not wait for my husband to get home that night. It would end up being too late in the day. So I asked the kids to play nice and not scream or interrupt me so I could concentrate... lol.  Well, I think you know where this story is going.

The steps to install the bees into a hive from the new busses is slightly different from what I did previously. After watching the video of how the new busses work I was hoping for the best. I knew it would be a bit tricky with my recent surgery. My hands are both pretty weak.

First package, I was able to get my first queen cage out and put her in my pocket fairly easily.  I sprayed the bus with sugar water really good to wet the bees. It took a lot more work to open the end of the bus with my hive tool than it did with the old wooden cages. Finally I got it open and I dumped the bees into their new home. I instantly started to curse under my breath (and I do not curse). The new buses plastic cages really did not allow the sugar water to penetrate on to the bees. So when I dumped them into the hive, they did not stay there. They were flying everywhere. Then to add to my frustration, I realized I forgot to remove the cork from the queen cage and replace it with a marshmallow. This was suppose to be BEFORE I dumped the bees! Now not only did I have thousands of bees flying all over, I also had to somehow calmly but quickly get the queen in there with them.

Keep in mind, my kids are SCREAMING at eachother less than 50 feet away and I am trying my best to concentrate.

Frustrated, I was able to get the cork out and was covering the hole with my glove. I realized that my finger was not all the way over the hole. The gloves are longer than my finger. So I turned my wrist to pull the glove down a little. When I turned my wrist back to look at the queen and put in the marshmellow, she was gone. She had snuck past my gloved finger. I looked all over my arm and my body thinking maybe she was crawling on me. Nothing. What a great start.

I could not find her anywhere. I placed the cage in the hive and closed it up hoping she had flew in or would fly back. The kids were still fighting like rabid dogs in the background (ok, it was probably not that bad but really when you are trying to concentrate it seems like it). My heart sank. I still had two more packages to install. There was no one else who could do this, I needed to keep going.
I took a deep breath, said a quick prayer and started to work on my second package. The second and third went very smoothly. It was still hard to open the buses with the hive tool (aka small crowbar). The thickness of the plastic cages blocking the sugar water was still a problem. I sprayed a ton so they were flying less but still more than normal.

Most importantly, I decided to remove my gloves to work with the other two queens.  This allowed me to work with them more easily. I also stepped away from the hives about 20 feet while doing it. I did not have bees hovering around me. I took my time. I talked to each queen about her new home. I welcomed her. I found this little one on one time with the queen to be very peaceful and calming.

I was able to finish the last two hives with the queens (and most the bees) safely in their new homes. The kids were now playing peacefully in the backyard. With much hope for my girls (and my possibly AWOL queen) I went to the house to make dinner...


Stay tuned for more on happenings with the girls.
Blessings!

If you enjoyed this post, I’d be very grateful if you’d help it spread by emailing it to a friend, or sharing it on Google+, Twitter or Facebook.

Saturday, December 5, 2015

Five more DIY gifts for Christmas using Essential Oils

This years "Christmas Make and Take" was a ton of fun. I took it up a notch with some of our projects. We made gifts which were a little more time intensive but overall are fairly easy and truly make great gifts for everyone on your list.


Comfort and Joy Lotion Bars: First up is my all time favorite lotion bar. I have been gifting these for years and I always get tons of compliments. These bars were seasonally scented with Joy and Orange essential oils to create a fun and luxurious bar. They are great for dry cracked skin. Rub them in your hands and the heat from your body will melt the oil. These bars are very moisturizing. I get cracked skin along my finger nails in winter and I will rub my lotion bar on the cracks at bedtime. By morning the crack will be gone.

You can use lots of options to make this with different molds. I use a small loaf silicone mold but you could make hearts for Valentines, silicone muffin mold for round shapes as well!

You will need:
1 cup beeswax
1 cup mango butter
1 cup coconut oil
1-2 tsp vitamin E oil or about 5 capsules of vitamin E
50 drops of essential oil- for this project we used 25 drops of Joy EO and 25 drops of Orange EO

In a double boiler melt the beeswax, mango butter and coconut oil. Once melted, remove from heat and add Vitamin E and essential oils. Then pour into molds. Let completely cool before removing from mold or if using deodorant containers make sure it is cooled completely before adding the cap.

Using the mold above I generally get 10-11 bars.

Essentially Infused Sea Salt Trio:Second we made Essential Infused Sea Salts in Rosemary, Basil and Oregano. I found some super cute jars (wedding favors) and some great coordinating stickers and boxes.

1. Rosemary bowl combine: 2 level Tablespoons sea salt with 1 drop of Rosemary EO
2. mix well then add 1 level Tablespoon dried Rosemary
3. mix in bowl and then scoop/pour into jar with a funnel
4. place the cover and label it, repeat with each herb, (keep separate bowls for each herb)


Diffuser Bracelet:Third up is diffuser bracelet. Using natural stones, Amazonite and Lava we created super cute bracelets and paired it with a mini dropper bottle so each person could share their favorite scent with the receiver.

1. Cut 9-10" of magic cord (1mm)
2. use 16 amazonite stones (8mm) and 3-5 lava stones (8mm or 10mm) to make your bracelet (don't fill the string or you won't be able to tie it!!!
3. triple knot it (hardest part)
4. put one dab of superglue on the knot
5. once dry, cut ends.

White Christmas Bath Bombs:These Luxury Bath Bombs with White Angelica EO and Lavender EO were like heaven....oh they smelled sooooo good. When you are ready to use them, fill your tub, climb in and drop in the bomb!

1. Combine in a large glass or stainless steel bowl until well blended: 
  • 8 ounces Baking Soda for your skin and the bathwater
  • 4 ounces Corn Starch
  • 4 ounces Epsom Salts
2. Add the following ingredients and blend well: 
  • 2-3 tsp. witch hazel
  • 15 drops of Essential Oil for scent (more or less depending on how strong you want it and what scent you are using)
  • 2 tsp. almond oil for your skin
  • Food coloring if you want colored bombs and water.
3. At this point, your mixture should resemble wet sand.  Adding the food coloring helps you figure out if it’s well-mixed, an even color means a good mix.  When you squeeze some in your fist, it should hold together.  If it doesn’t, add witch hazel a teaspoon or less at a time until desired consistency is reached. ***Don't add too much liquid or it expands... a lot.

4. Add 4 ounces Citric Acid (this is what gives you the fizz). Mix well, but use a spoon for this because the pure citric acid can irritate your skin.

5. Once well mixed, tightly pack it down into your mold.  Let it dry 24 hours in the mold before removing.


Christmas Spirit Scented Soap: Finally we made Christmas Spirit Scented and swirled soap. I have wanted to do a soap for a long time. We used a glycerin melt-and-pour soap with shea butter. Its important when shopping for soaps that you look at the ingredients and choose one that you are comfortable with. 
  1. Chop the soap into cubes and melt slowly in a double boiler or microwave. 
  2. Once melted, remove from heat and allow to cool slightly. 
  3. Add your essential oils and mix well. (We used approximately 5ml bottle of Christmas Spirit for 2 1/2 pounds of soap.)
  4. Pour into molds.
  5. Let it set slightly, when a skin starts to show on the top is the best time to add liquid soap colorant. I used 5-7 drops in each muffin cup. stir slightly with a popsicle stick.
  6. Spray with rubbing alchohol to break surface tension and pop a y bubbles. Leave to cool and harden. Do not place in fridge to speed it up- this will result in sweaty soap.
  7. Once completely cooled wrap in saran wrap.
  8. This recipe made 12 bars of soap, but will vary depending on molds you use and how much you fill them.
Let me know what you are making this Christmas. I would love to hear about it!
Blessings!!

If you enjoyed this post, I’d be very grateful if you’d help it spread by emailing it to a friend, or sharing it on Google+, Twitter or Facebook.


Wednesday, November 11, 2015

The End of the 1st Bee Year


Oh the excitement of harvesting the honey!! I never expected (or planned) to be doing it this year. It was a whirlwind but once the honey was collected and the excitement past, there were still a few important tasks to be done.

So let's talk a little bit about what happens with the bees after the harvest. Afterward you have to: clean up the supers (the boxes we removed the honey from), clean the beeswax, feed the bees and ultimately prepare the hive for winter.

 
First step is feeding. Above is a large pot of sugar syrup I was in the process of making to feed the bees. Once you remove all the honey supers you want to feed them. This is to prevent them from eating all their winter stores before true winter even starts. There is not much nectar available for foraging after labor day in this area so they will start to consume what they stored to stay alive if you do not provide them with other sources of food. I also gave them pollen patties, which is a source of protein for them.

Note: I removed 100 pounds of honey from the hive, which is awesome for a first year hive! I left them with a very full deep box filled with honey for winter, it was approximately 80 pounds. 

The bees help with cleanup. After harvesting the honey from the frames, I placed the supers back on the hive and they clean up all the leftover honey very quickly. After cleanup the boxes go into storage for next spring- for when the bees will make honey again.

My second big task was to take care of all the beeswax I had collected. The crush and strain method I used to harvest honey resulted in lots of wax for one hive. I decided to use this low heat double boiler method to clean my wax.


It worked beautifully and I ended up with almost 7 pounds of absolutely wonderful smelling clean wax.


Finally, once the temperatures drop it is time to remove the feeding pail and wrap the hive. I reduce the entrance to the smallest opening to help them defend from honey robbers, mice and other opportunistic predators. They do fine taking turns in the little door.

In the winter, they do not hibernate. They are awake but just not foraging. They form a cluster to stay warm inside the hive. Wrapping the hive helps keep them warm in our harsh Minnesota winters. It is an added insulation and also helps generate heat in the sun because of the dark color. I used a black cardboard box for insulation. You can also wrap it with a double layer of roofing paper. A windbreak on the northeast corner is also recommended to shield them from the harsh winter winds. You will notice there are two holes for them to go in and out. (They do need to leave the hive to relieve themselves all winter long.) The upper hole is in place because as winter goes on the lower entrance may be blocked by snow or other debris. In my winter preparations I also included a moisture board. This goes on the top of the hive to collect condensation. Condensation happens from the bees activity inside the hive. It collects on the top, inside and can drip down on the bees causing them to freeze.

Winter is the time when most beekeepers lose their hives. Last year in MN it was a 50% loss. There are so many factors at play in this. The length of the winter, how severe the winter is, the strength of the colony, the mite load and disease resistance and so much more. At this point the best you can do is make sure they have plenty of food and offer them some winter protection in hopes they survive until spring.


It is suppose to be a mild winter, so I am praying they will survive it. We are planning on expanding our apiary in the spring with hopes to have more honey and stronger bees next year. Next year I plan to use essential oils to assist in my honey bee health and pest management.
This little video shows my girls getting out on an unseasonably nice 60 degree November day. I saw several return with full pollen baskets. Wonderful to see they are finding some pollen.

I have been up to check on them a few times since wrapping the hive. We have had some warmer weather so I saw the girls out foraging last weekend. I will probably get up there a few times this winter to check on them in hopes that I will see- or more accurately hear-any activity.


Blessings!

Monday, June 22, 2015

Green Your Clean Series! Your body products


So far, we looked at a few areas of the home: the bathroom, the laundry room and the kitchen. Now lets wrap this up and take a look at how you may green up your personal body products.

When you look at all the things you put on your body, the chemical load can really add up. Lotion, shave gel, soap, shampoo, conditioner, mousse, hairspray, foundation, eye shadow, toothpaste, deodorant... I could go on and on. Look at the ingredient list on just one of those products...pretty crazy huh? 

I do not recall exact order I took when changing over products. It was one thing at at time. Taking the first step. Mostly I looked for stuff I could replace (and still be satisfied with it) without paying a ton of money for. This is how I ended up making most of my stuff (much cheaper) and ultimately what led me to Young Living.

Here is a little list of things I have done and hopefully you will find some you can try crafting. You can change the essential oils used for the scent or benefit you desire.

Foaming Shave Soap - love this stuff!

Sugar scrub - great exfoliant

Foaming Hand Soap - this can also be used in the shower or bath

Deodorant - no stink here!

Bath salts also here - so many options!

Roll on Perfume

Lotion Bar

Face Serum - replaces my face moisturizer
Magnesium Oil - great way to get your magnesium

Baby wipes - not just for babies, works great for clean ups of many kinds!

Waterless Hand Sanitizer - oh, this stuff is the bomb!

Here are two new things I have done that I have not talked about before:

Thieves Toothpaste: I made this one last year. Pretty simple to make. If you try it let me know what you think. This recipe makes a small amount which is nice, since you do not need much.

What you will need:
1/2 tablespoons bentonite clay
1/2 tablespoons coconut oil
1/4 teaspoon sea salt - finely ground
1/2 tablespoon hot water
4-5 drops Thieves essential oil


Stress Away and Lavender Whipped Body Butter: This is awesome for all over lotion. I have made it with a few different essential oils but I think stress away and Lavender are my favorite combinations.

What you will need:
1/2 cup coconut oil
1 cup mango butter (or shea butter or cocoa butter or a mix or each)
1/2 cup sweet almond oil
1 teaspoon vitamin E oil
essential oils of your choice! (I put in 10 of each stress away and lavender but I do love my oils!)

Melt the coconut and butters in a double boiler. Remove from heat and add almond oil, vitamin E. Chill in fridge for 1-2 hours until it starts to solidify. Then mix in a stand mixer with the whip attachment to get it a whipped consistency. It will take several minutes. Add essential oils and mix them in. Store in a jar on your counter. (If your home it really warm it may melt but you can always whip it back up.)

So what do you want to replace? What have you tried? What is missing from this list?
Where ever you decide to start, have fun playing and enjoying all your chemical free body products.

Blessings!

If you enjoyed this post, I’d be very grateful if you’d help it spread by emailing it to a friend, or sharing it on Google+, Twitter or Facebook.
Saturday, May 23, 2015

Busy bees

So I just have to share some pictures of my girls...

Here they are waiting for me...lol

The box is more than 80% full, so it is time to add another deep hive body.


I took one frame from the outer edge of the current box to put into the center of the new box. This will encourage them to start to move into the new area. You can also see my smoker sitting near by... I smell like a campfire!

Wow... lots of bees huh?

Looking at the frames.

This picture I caught a few larvae at different stages (sizes).

I thought the huge pollen packs this bee was carrying was cool. Also thought I would point out the really large eyes on the drone (male) bee compared to the worker (girl) bees.

They sure are busy bees!
Hope you enjoyed the quick update.

Blessings!!

If you enjoyed this post, I’d be very grateful if you’d help it spread by emailing it to a friend, or sharing it on Google+, Twitter or Facebook.

Saturday, May 9, 2015

Keeping Up With the Bees- 3 weeks since install


It has been three weeks since I installed the package. The bees have been busy and we have had some fun spotting them all over the yard. Our girls are working hard in the hive.

Here is the timeline so far:
  • December- I received my hive and some beekeeping supplies for Christmas.
  • January- I ordered my three pound bee package from a local supplier out of Stillwater.
  • March through April we prepped for the bees arrival.
  • April 18- Bee Day! My daughter and I drove to Stillwater to pick up and then installed the bees.
  • April 19th- went to check on the feeder pail to be sure it was dripping properly. Found some bees locked out of the hive and I put them inside. Removed the grass plug in the entrance.
  • April 26th- My first time using the smoker and opening the hive since I installed them. I checked on the bees and removed the queen cage. Later that day, I also visited my daughter's kindergarten class to share about our bees. 
  • April 29th- I went up to add 1:1 sugar syrup in the feeder pail and was happy to see eggs- one per cell that is good!

Today (May 9th): I took a camera along so I could share more!


My daughter came up to observe when I opened the hive. She was very excited (and my husband was jealous). I know very soon she will be working with the bees too. She was not scared at all and did very well. I need to get her some leather gloves. Her garden gloves were too small so I had her wear mine for today.
Removed the telescoping and inner covers. The feeder pail was still pretty full so I did not refill it yet. Here you can see the busy girls from the top of the main part of the hive. 


Removed frames to inspect for eggs and larve. You can see some dark cells. Those are filled with pollen.

They are going a little crazy building wax in the center on the green frame.


Look close in the cells and you can see the larvae!

Here is a close up. The blue circle is the larve. The red circle is an egg... tiny! The green cicle shows you some capped cells. When the pupae is fully developed the bee will chew its way out of the cell.


One of my pretty girls!

My son is getting in on the bees too. He watched them gathering nectar and pollen on the azelea through the window. He said, "the bees are making me honey."
So there it is. I will be going back weekly throughout the summer. As summer progresses we will be moving frames around, adding more boxes (deep hive body) and possibly a honey super if the girls really get going. I will also be checking for different diseases and pests along the way to be sure they are healthy.  I hope you enjoyed the visit.

Blessings!!

How many are your works, Lord!
In wisdom you made them all;
the earth is full of your creatures.

~Psalm 104:24 (NIV)

If you enjoyed this post, I’d be very grateful if you’d help it spread by emailing it to a friend, or sharing it on Google+, Twitter or Facebook.