Tuesday, December 22, 2015

Loving your diffuser? Keep it running strong by following these guidelines...

Everyone LOVES their diffuser. They smell so wonderful, add to your health and make your home a spa!

Then there is the cleaning part. So yeah... I slacked on cleaning my diffusers. And now I am paying for it. My home diffuser is sadly not working, all because I did not follow some really simple guidelines. Don't make the same mistake. Show your diffuser some love and it will love you back.

1. Read the instructions. Different diffusers have different needs. I know most of us do not read instructions. I myself am a skimmer... However each diffuser is different~some have multiple functions.

2. Start slow. When adding oils to your diffuser, until you know what works best for you, start with less drops. You can always add more but if you have too much you will end up having to dump it out and starting over.

3. Know what kind of water is used. For example, tap or mineral water is used for the dewdrop, orb and bamboo diffusers. The home diffuser uses purified or distilled water. This is important because the diffusers are specifically made to work with or without the minerals in the water. Using the wrong water type will shorten the life of your diffuser.

https://www.youngliving.com/vo/#/signup/start?site=US&sponsorid=1639797&enrollerid=1639797
3. Know how to clean and how often. The home diffuser should be cleaned after each use and the leftover water discarded. This was my failure. I left the water in and added more...I won't do that again!

4. Know how to remove water/oils. Emptying the diffuser means you need to be aware of the ventilation holes. Tilting it in the correct direction will make sure you will not have oils or water go into the motor.

5. Do not overfill you diffuser. The diffusers have water level fill lines. You can go below it but do not go above it.

6. Clogged diffuser? Read about how to clean your diffuser in the manual that came with it. Here are some links to care instructions: orb, home diffuser and dewdrop. You can try cleaning it with water and rubbing alcohol and a soft sponge. Hopefully you can save it!

Unlike other brands, Young Living diffusers have a one year warranty! How awesome is that?? Young Living customer service is great at helping out if you do have any problems. My diffuser, badly abused lasted almost two years. But I am sure I could have had several more if I would have taken proper care of it.

For more diffuser comparisons and part numbers for each, see this handy comparison chart.

Looking for some great combinations to diffuse? Check these out...

Love your diffuser and it will love you back! Happy diffusing!
Blessings!!

If you enjoyed this post, I’d be very grateful if you’d help it spread by emailing it to a friend, or sharing it on Google+Twitter or Facebook.

Saturday, December 5, 2015

Five more DIY gifts for Christmas using Essential Oils

This years "Christmas Make and Take" was a ton of fun. I took it up a notch with some of our projects. We made gifts which were a little more time intensive but overall are fairly easy and truly make great gifts for everyone on your list.


Comfort and Joy Lotion Bars: First up is my all time favorite lotion bar. I have been gifting these for years and I always get tons of compliments. These bars were seasonally scented with Joy and Orange essential oils to create a fun and luxurious bar. They are great for dry cracked skin. Rub them in your hands and the heat from your body will melt the oil. These bars are very moisturizing. I get cracked skin along my finger nails in winter and I will rub my lotion bar on the cracks at bedtime. By morning the crack will be gone.

You can use lots of options to make this with different molds. I use a small loaf silicone mold but you could make hearts for Valentines, silicone muffin mold for round shapes as well!

You will need:
1 cup beeswax
1 cup mango butter
1 cup coconut oil
1-2 tsp vitamin E oil or about 5 capsules of vitamin E
50 drops of essential oil- for this project we used 25 drops of Joy EO and 25 drops of Orange EO

In a double boiler melt the beeswax, mango butter and coconut oil. Once melted, remove from heat and add Vitamin E and essential oils. Then pour into molds. Let completely cool before removing from mold or if using deodorant containers make sure it is cooled completely before adding the cap.

Using the mold above I generally get 10-11 bars.

Essentially Infused Sea Salt Trio:Second we made Essential Infused Sea Salts in Rosemary, Basil and Oregano. I found some super cute jars (wedding favors) and some great coordinating stickers and boxes.

1. Rosemary bowl combine: 2 level Tablespoons sea salt with 1 drop of Rosemary EO
2. mix well then add 1 level Tablespoon dried Rosemary
3. mix in bowl and then scoop/pour into jar with a funnel
4. place the cover and label it, repeat with each herb, (keep separate bowls for each herb)


Diffuser Bracelet:Third up is diffuser bracelet. Using natural stones, Amazonite and Lava we created super cute bracelets and paired it with a mini dropper bottle so each person could share their favorite scent with the receiver.

1. Cut 9-10" of magic cord (1mm)
2. use 16 amazonite stones (8mm) and 3-5 lava stones (8mm or 10mm) to make your bracelet (don't fill the string or you won't be able to tie it!!!
3. triple knot it (hardest part)
4. put one dab of superglue on the knot
5. once dry, cut ends.

White Christmas Bath Bombs:These Luxury Bath Bombs with White Angelica EO and Lavender EO were like heaven....oh they smelled sooooo good. When you are ready to use them, fill your tub, climb in and drop in the bomb!

1. Combine in a large glass or stainless steel bowl until well blended: 
  • 8 ounces Baking Soda for your skin and the bathwater
  • 4 ounces Corn Starch
  • 4 ounces Epsom Salts
2. Add the following ingredients and blend well: 
  • 2-3 tsp. witch hazel
  • 15 drops of Essential Oil for scent (more or less depending on how strong you want it and what scent you are using)
  • 2 tsp. almond oil for your skin
  • Food coloring if you want colored bombs and water.
3. At this point, your mixture should resemble wet sand.  Adding the food coloring helps you figure out if it’s well-mixed, an even color means a good mix.  When you squeeze some in your fist, it should hold together.  If it doesn’t, add witch hazel a teaspoon or less at a time until desired consistency is reached. ***Don't add too much liquid or it expands... a lot.

4. Add 4 ounces Citric Acid (this is what gives you the fizz). Mix well, but use a spoon for this because the pure citric acid can irritate your skin.

5. Once well mixed, tightly pack it down into your mold.  Let it dry 24 hours in the mold before removing.


Christmas Spirit Scented Soap: Finally we made Christmas Spirit Scented and swirled soap. I have wanted to do a soap for a long time. We used a glycerin melt-and-pour soap with shea butter. Its important when shopping for soaps that you look at the ingredients and choose one that you are comfortable with. 
  1. Chop the soap into cubes and melt slowly in a double boiler or microwave. 
  2. Once melted, remove from heat and allow to cool slightly. 
  3. Add your essential oils and mix well. (We used approximately 5ml bottle of Christmas Spirit for 2 1/2 pounds of soap.)
  4. Pour into molds.
  5. Let it set slightly, when a skin starts to show on the top is the best time to add liquid soap colorant. I used 5-7 drops in each muffin cup. stir slightly with a popsicle stick.
  6. Spray with rubbing alchohol to break surface tension and pop a y bubbles. Leave to cool and harden. Do not place in fridge to speed it up- this will result in sweaty soap.
  7. Once completely cooled wrap in saran wrap.
  8. This recipe made 12 bars of soap, but will vary depending on molds you use and how much you fill them.
Let me know what you are making this Christmas. I would love to hear about it!
Blessings!!

If you enjoyed this post, I’d be very grateful if you’d help it spread by emailing it to a friend, or sharing it on Google+Twitter or Facebook.


Wednesday, November 11, 2015

The End of the 1st Bee Year


Oh the excitement of harvesting the honey!! I never expected (or planned) to be doing it this year. It was a whirlwind but once the honey was collected and the excitement past, there were still a few important tasks to be done.

So let's talk a little bit about what happens with the bees after the harvest. Afterward you have to: clean up the supers (the boxes we removed the honey from), clean the beeswax, feed the bees and ultimately prepare the hive for winter.

 
First step is feeding. Above is a large pot of sugar syrup I was in the process of making to feed the bees. Once you remove all the honey supers you want to feed them. This is to prevent them from eating all their winter stores before true winter even starts. There is not much nectar available for foraging after labor day in this area so they will start to consume what they stored to stay alive if you do not provide them with other sources of food. I also gave them pollen patties, which is a source of protein for them.

Note: I removed 100 pounds of honey from the hive, which is awesome for a first year hive! I left them with a very full deep box filled with honey for winter, it was approximately 80 pounds. 

The bees help with cleanup. After harvesting the honey from the frames, I placed the supers back on the hive and they clean up all the leftover honey very quickly. After cleanup the boxes go into storage for next spring- for when the bees will make honey again.

My second big task was to take care of all the beeswax I had collected. The crush and strain method I used to harvest honey resulted in lots of wax for one hive. I decided to use this low heat double boiler method to clean my wax.


It worked beautifully and I ended up with almost 7 pounds of absolutely wonderful smelling clean wax.


Finally, once the temperatures drop it is time to remove the feeding pail and wrap the hive. I reduce the entrance to the smallest opening to help them defend from honey robbers, mice and other opportunistic predators. They do fine taking turns in the little door.

In the winter, they do not hibernate. They are awake but just not foraging. They form a cluster to stay warm inside the hive. Wrapping the hive helps keep them warm in our harsh Minnesota winters. It is an added insulation and also helps generate heat in the sun because of the dark color. I used a black cardboard box for insulation. You can also wrap it with a double layer of roofing paper. A windbreak on the northeast corner is also recommended to shield them from the harsh winter winds. You will notice there are two holes for them to go in and out. (They do need to leave the hive to relieve themselves all winter long.) The upper hole is in place because as winter goes on the lower entrance may be blocked by snow or other debris. In my winter preparations I also included a moisture board. This goes on the top of the hive to collect condensation. Condensation happens from the bees activity inside the hive. It collects on the top, inside and can drip down on the bees causing them to freeze.

Winter is the time when most beekeepers lose their hives. Last year in MN it was a 50% loss. There are so many factors at play in this. The length of the winter, how severe the winter is, the strength of the colony, the mite load and disease resistance and so much more. At this point the best you can do is make sure they have plenty of food and offer them some winter protection in hopes they survive until spring.


It is suppose to be a mild winter, so I am praying they will survive it. We are planning on expanding our apiary in the spring with hopes to have more honey and stronger bees next year. Next year I plan to use essential oils to assist in my honey bee health and pest management.
This little video shows my girls getting out on an unseasonably nice 60 degree November day. I saw several return with full pollen baskets. Wonderful to see they are finding some pollen.

I have been up to check on them a few times since wrapping the hive. We have had some warmer weather so I saw the girls out foraging last weekend. I will probably get up there a few times this winter to check on them in hopes that I will see- or more accurately hear-any activity.


Blessings!

Thursday, October 8, 2015

Bath Tea, the no mess way to enjoy a spa like bath


So who does not love the idea of the beautiful bathtubs with rose petals and wonderful spa scents... until you realize you have to clean it up. Well, worry no more! You can make bath tea! This was so easy to make and it smelled and looked wonderful. This would make a great gift for teachers, friends and family. Just place three bags into a box or mason jar with some simple instructions. 

Ingredients:
1 cup Epsom salt
1/2 cup oatmeal (finely ground in food processor)
1/2 cup powdered milk (whole preferred)
2-4 T dried flowers (I used rose petals and calendula from my garden)
8-10 drops essential oils (I used Lavender)

Directions:
Mix the ingredients together in a large bowl.  Scoop carefully into extra large tea bags and tie shut. You can add a tag if you like as well. To use, place one tea bag in tub before running water. If you don't mind the clean up feel free to open it and pour contents into your tub.

Don't forget to grab a good book and light a candle or seven. Take some time to really relax and enjoy it. Let me know how you liked it!

If you enjoyed this post, I’d be very grateful if you’d help it spread by emailing it to a friend, or sharing it on Google+Twitter or Facebook.


Blessings!

Tuesday, October 6, 2015

Kids Bedtime Spray


I recently hosted a Back to School Make and Take and one of the things we made were bedtime sprays. We had two options for them to choose from. They were also invited to decorate the bottle with stickers, markers, etc. to make it their very own.

A good nights sleep is a great way to help your little one start their day. Some kids have problems falling asleep because of fears.  Monsters or other nighttime fears can be hard to rationalize with little ones. I have found its better to acknowledge the fear and give them something to help overcome it. Monster spray can be a great help here! White angelica has really helped our family in this area. Lavender and white angelica is what I used with my little guy when he was waking in the middle of the night with night terrors. He loved to spray it on his pillow and blanket and he no longer woke screaming in the night. (happy mama)

Some kids have trouble staying asleep or may wake up really early. Cedarwood is a great scent and can help extend the sleep cycle.  I really have fallen in love with it. In fact, lavender and cedarwood is what I use nightly in my diffuser. (You don't have a diffuser? Then, we need to talk!)


Monster Away Spray or Sleep Spray:
1.  place 2-3 drops glycerin in bottle
2.  10 drops of lavender
your choice of:
o    5 drops of White Angelica (monster) or
o    5 drops of Cedarwood (extended sleep)
3.  add approx 1 ounce distilled or purified water
4.  top off with approx. 1 ounce witch hazel or 100 proof alcohol
5.  add top and shake well
6.  decorate sticker and add to bottle!
7.  spray on linens (or monsters) before bed

Involve your kids in making it and I hope you enjoy a restful night sleep!

If you enjoyed this post, I’d be very grateful if you’d help it spread by emailing it to a friend, or sharing it on Google+Twitter or Facebook.

Blessings!!


Sunday, September 20, 2015

It IS all about the food....

It's been over three months since I realized gluten was a problem for me. For the most part,  I have ate really clean. There was the occasional breaded chicken breast or slice of pizza. But overall I stayed away from gluten and I was feeling really good. I had zero headaches, I was sleeping well, my tendonitis was gone, my plantar fasciitis was gone, I had more energy, over all my pain was significantly less, my wrists were not hurting at all and I was way overdue for my cortisone shots. So why would I mess with it???

Well, short story, I did. 

I had decided to try the Whole30 diet. I wanted to see if I could eliminate all pain and be more scientific about it. I also had the little voice in my head saying...is it really gluten? It could just be a coincidence. So two weeks before starting the Whole30 I decided to eat gluten. It had been several years since I did this regularly. I went a little berserk... I had buns with my burger, tortillas with my burrito, slice after slice of pizza, and breaded everything on a stick.  We went to the state fair, renaissance festival, various parties with family and friends, a mini vacation and out to eat at restaurants. I spent two weeks in total gluttony. And I regret every bite. 

Three days in I started having trouble sleeping. By day five I was waking with headaches. Pain started to return in my entire body. My wrists started aching again, plantar fasciitis flared and I could even start to feel my tendonitis. Consequently I also gained over five pounds. Yeah. Totally not worth it.

I found myself actually looking forward to starting the Whole30. Of course I was not looking forward to some parts, like no cheese or chocolate. But I was looking forward to feeling better again. 

I am currently halfway through it. I must admit it has not been easy. It's hard to cook completely separate meals for yourself while preparing and watching everyone else eat what you enjoy. It's hard to go to any gathering and have to just drink water while you politely decline all offerings of food or drink. 

I went through all the stages in what to expect on the Whole30 for the days I have completed. Yes, I went a little crazy when my husband left a big plate of chips in front of me and walked away. And yes I have craved and craved all the little things. But you know what, I have not given in. I'm still going and I'm just fine. The pain is still here, although it's improving. I know it will keep getting better. The world has not ended without butter, cheese or chocolate. I know it will be there when I'm done, if I still want it then.

Instead of looking back- to all my mistakes, or looking forward- to when will this finally be over, I try to focus on each day one at a time. Because I can do this. I will do this. And it's really not that hard. 

How about you, have you ever denied yourself something for something greater? What saw you though it? What was your inspiration?

Until we meet again, may you find the happiness you seek.

If you enjoyed this post, I’d be very grateful if you’d help it spread by emailing it to a friend, or sharing it on Google+Twitter or Facebook

Blessings!

Tuesday, August 25, 2015

For the Love of Summer

What more can I say....
I LOVE summer!

At the start of summer, my daughter and I talked about all the things we wanted to do. We had a few short trips planned some special outings and annual activities we wanted to be sure we did.

However, in the day to day rush, one thing I wanted to focus on was nature. I wanted to be outside as much as possible. I wanted to be intentional in this so I made a list. I included simple things, the memories from my childhood I hold dear. Things like: nature walks, feeding the birds, swimming in the lake, playing with friends, fishing, gardening, time with family, swinging, running through the sprinklers, fairs, picking flowers, playing in the rain, blowing bubbles, crafts and so much more.

My six year old loves art and science. I of course (the list maker) had to make a list of some specific nature crafts and science fun to our summer bucket list. Things like: diy fruit roll ups, sun catchers, painting, baking, dried flowers, pressed flowers, rock art, wind chimes, planting from seed and more.

Overall, it has been three months of fun, but I swear I blinked my eyes and it was gone. Last week, we had a sudden and extended cool down and the weather became more like fall. We walked around the yard to pick flowers for a sun catcher to preserve a little of the summer goodness. This week we turned our summer suncatcher into a windchime. (I think it turned out cute.)

Soon, school will start and our free time will be limited. I find myself mourning the loss of summer as I did as a child. I love summer and all it brings. However, I find the time I spend with my kids even more precious.

Always too short, this has been a beautiful summer in Minnesota. We have been blessed to have so much fun with great friends, family and truly wonderful weather.

I hope you had a wonderful summer. Its not quite over yet, so get out and grab some before its gone!
Blessings!!


"But ask the animals, and they will teach you, or the birds of the air, and they will tell you;  or speak to the earth, and it will teach you, or let the fish of the sea inform you. Which of all these does not know that the hand of the LORD has done this?  In his hand is the life of every creature and the breath of all mankind." ~Job 12:7-10 

If you enjoyed this post, I’d be very grateful if you’d help it spread by emailing it to a friend, or sharing it on Google+Twitter or Facebook.


Friday, July 31, 2015

Honey Time!

Today was a big day! My husband came up to the hive to help. It was his first time there. The boxes are so heavy with honey now I can't lift them on my own. I guess I need to start lifting weights to get my strength up (I didn't think I was that weak but these puppies are heavy!)

With my husband there helping with the heavy lifting we also had extra hands for pictures. This allows for some peeks into what I do that I could not otherwise share.


Smoking the hive to calm the bees and send them down out of harms way.

I am standing uphill, I have already taken off 
the top cover, inner cover and 1 honey super... its still really tall!

Looking at the queen excluder, this is what keeps the queen 
in the lower part of the hive. It also keeps a separation from 
our honey and the bees honey.

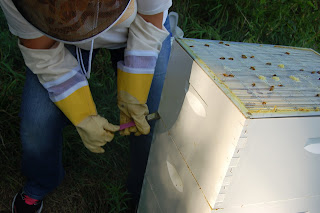
I use a hive tool (pry bar) to take apart the hive. 

The bees super glue it together! Its hard to get apart.

Inspecting the frame for eggs and larve. 
This is how you know your queen is present and healthy.

A peek down.

The hive tool is also used to loosen the frames. 
Those are glued in too. The bees use more glue 
than a whole football stadium of kindergarteners.

More inspection.


Showing my husband some babies (larvae).

The boxes get stacked up on the side as we remove 
and check each box.

A capped frame of honey ready for harvest!

Scrapping the honeycomb from the frame.

I finished scrapping so my husband took
the opportunity to taste his first bit o' honey.

Let the straining begin!
So now the honey and the wax will separate. The honey will drip into the bucket and the wax will stay in the strainer. I will be checking on it tomorrow to see how the straining is going. I plan to return to the hive this weekend to get more frames and continue the gathering of the honey. It will be fun to see how much honey we get from that one honey super this week (one honey super holds ten frames of honey, today we removed two). Then we will be working on the next one and the next and the next. We have four honey supers to strain. Each super holds approximately 35 pounds of honey. Its looking to be a big year for honey!

So there it is, the start of something sweet. I hope you enjoyed your visit to the hive. The girls have been so busy this year.

Blessings!

If you enjoyed this post, I’d be very grateful if you’d help it spread by emailing it to a friend, or sharing it on Google+, Twitter or Facebook.

Thursday, July 30, 2015

Empty bottles? Don't toss them! How to clean and reuse your essential oil bottles

Many times I have been asked, "What is the best roll on?" My personal favorite is to make your own with the Young Living bottle the oils came in and the roller fitments from Young Living. (My first roll on was born when I reached the bottom of my lavender bottle.) These bottles are free, they do not leak and the metal roller applies the oils perfectly.

Lets talk about some ways your can get every drop from your oils and how to clean the bottles to reuse them. I had several bottles which were empty. Here are some of the things I did:

When I have needed a roll on of the oil or a blend that included the essential oil I had just emptied I just used it as is. I remove the top add a carrier oil and the drops needed of essential oil. Then add my top.

The relaxing essential oils like stress away, peace and calming and lavender I take the tops off and bury them in epsom salts. The oils get absorbed into the salts. Those salts are used for baths for the family. Once I am done with them in the salts, I can then clean and resuse the bottles. You can also make other jars of bath salts for other purposes like for energizing or to alleviate aches and pains.

I decided to keep my empty peppermint for use at the gym. To give myself a boost I can open the bottle and breathe in the energizing goods.

I had several other bottles which I had previously removed the reducer to get the last drops out. (Yes there still is a few drops in there!)

The deep relief bottle was the messiest.
Once I have a bunch of bottles I need to clean, I remove the tops and reducers (for more on an easy way to do that see this post). Then remove the labels. They come off real easy. I use my homemade gunk remover to get the last of the sticker residue off. I put the gunk remover on and let it sit for a few minutes, then rub it off with a paper towel.

Once the outside is clean, it is time to clean the inside. Remove the rings and dropped them into hot water while I clean the rest of them. I let them soak a little, then rinse them. Finally, soak with hot water and all natural dish soap to remove the last of the oil. Rinse them well and let them air dry. Now they are ready to be reused.


So, what have you used your bottles for? I love to have these on hand to whip up a blend or roller bottle or to bless someone else with essential oils. A super simple way to share the love of good health.
Blessings!

If you enjoyed this post, I’d be very grateful if you’d help it spread by emailing it to a friend, or sharing it on Google+Twitter or Facebook.

Saturday, July 11, 2015

News from the hive

Before opening the hive for inspection.
 Went up to check on the girls today. They have filled the third deep hive body and both supers. I added another super and need to start working on plans for harvest and doing a check for mites.
The two honey supers(far) and two of the deep hive bodies(near) removed.

The boxes are now extremely heavy. The full honey supers are about 50 pounds each and the full deep hive bodies are at about 75 pounds each. I had to use my whole body to lift them. Sometimes it took a couple tries. Also the girls really love to glue everything together with super glue.  I have come to understand the real need for the hive tool.
Entrance with my sticky board.
I made a sticky board last night (you can see the blue in the picture above) to check for varroa mites but I did not like how much it covered the entrance so I am going to do a sugar roll test next week instead. If I can get some pictures of that I will certainly share. It will be cute.

Have you heard of the varroa mites? They are a huge problem with our honey bees. They are a parasite that weakens the bees. The equivalent on you or me would be a wood tick the size of your head feeding off of you. Here is some more indepth information on the mites life cycle on the bee.

I think they were ready for me to go...
The girls were definitely ready for me to be on my way today. So many of them now it is really amazing. The hive now has three full deep hive bodies and three supers (I added one today). Two of the honey supers are full. Each full honey super will give you about 35 pounds of honey. Wow!

Have a great week everyone!
Blessings!

If you enjoyed this post, I’d be very grateful if you’d help it spread by emailing it to a friend, or sharing it on Google+Twitter or Facebook.

Thursday, July 2, 2015

Making the best out of what you are given

I recently came across a bumble bee hive near my garden. It was a bird house that was old, it had been a home for birds for a couple seasons, pecked on by woodpeckers for awhile and now it looks like some bumble bees have decided to call it home for while. 

I do not know how long they will stay or who may decide to use this old bird house next. But for now it is the bumble bees home. They are making the best of what they have in an amazing way.

Life is funny. Things change, always and often. Even when it feels like you are stuck in a particular stage of life before you know it there will be a new and seemingly even more pressing problem. Making the best of what you are given seems like such a simple concept. Why is it so hard to do?

Over the years I have seen my share of change. But as always life continues on and there are new challenges ahead. There were times when I was utterly and completely devastated and saw no hope. Then I found hope. I found hope in God. I believe that God will never give me more than I can handle, or better said, more than what he can help me handle. 

I have been to the complete brink of financial ruin, over seen more funerals than I care to say and have felt on so many occasions... complete and udder weight of the world on me. Yet I will have people who know what I am going through say, "How is it you are doing so well?" All I can say is I have God. I make the best of what I am given. Knowing he is on my side and there for me every step of the way. It gives me strength. I know that I can take that next step- even if I do not know where my foot will land.

I am so grateful for all God has given me. Sometimes it may seem hard to know what to do or how to handle what you are going through but I think it is helpful to have a little perspective from around you.... these bumble bees are making a home from a discarded rotting bird house. Make the best of it. Bee amazing.

“Therefore I tell you, do not worry about your life, what you will eat or drink; or about your body, what you will wear. Is not life more than food, and the body more than clothes? Look at the birds of the air; they do not sow or reap or store away in barns, and yet your heavenly Father feeds them. Are you not much more valuable than they? Can any one of you by worrying add a single hour to your life?" ~Matthew 6:25-34 NIV

It is a beautiful day, find the beauty and enjoy.


Blessings!


If you enjoyed this post, I’d be very grateful if you’d help it spread by emailing it to a friend, or sharing it on Google+Twitter or Facebook.

Tuesday, June 30, 2015

My girls are growing up... up ... up...

My girls have been so busy. I decided to add a third deep hive body today to give them more room and a better chance to survive the winter.  The hive is starting to look like a skyscraper! The boxes are getting so extremely heavy- way more than I had anticipated.

As I was taking the hive apart for the inspection, the bees were flying all over the place. I grabbed my camera and just hit the button to see what I would capture. I thought this picture was pretty neat.

If you were a bee you certainly could not be claustrophobic!

See the white wax being formed to store the honey?

View from the top.

View of the bottom.


When I put it all back together the ones on the outside were working to get back in. These were some of the ones flying around me.

Today, I was able to see lots of larvae, honey and pollen. I checked all the way down to the lowest deep and the bees were flying all over. It is crazy how many they have grown into in such a short period of time.

Below is a short video clip of the bees before I added the extra box. You can see the bees leaving. If you watch close you can see some that fly only a little ways and come back. Those are the young bees just learning to fly. They go out a little and come back, then go out a little farther and come back. It is fun to watch.


Hope you enjoyed the visit!
Blessings!

If you enjoyed this post, I’d be very grateful if you’d help it spread by emailing it to a friend, or sharing it on Google+Twitter or Facebook.